

Creating PDFs using React JS

Introduction
Hi, I’m Hugo — a Software Engineer on the Tax Adjustment team. In this post, I’ll show you how to generate polished PDFs in React with React PDF Renderer, sharing practical patterns and tips from my day-to-day work.
In modern web applications, generating professional PDF documents is a common requirement—think invoices, reports, certificates, contracts, and more. React PDF Renderer brings the familiar React component model to PDF generation, making it easy to design documents using JSX, styles, and a declarative approach.
.png)
Why React PDF Renderer?
Before building, here’s why React PDF Renderer is a great choice:
1. React-like API
- Uses familiar components and JSX
- Similar lifecycle and mental model as React
- Easy to adopt for React developers
2. Powerful features
- Dynamic data and conditional rendering
- CSS-like styling via StyleSheet
- Automatic pagination
- Images, custom fonts, and links
- Supports tables and complex layouts
3. Flexible runtime
- Works in the browser and Node.js
- Synchronous and asynchronous rendering
- Flexbox-based layout engine
4. Performance
- Efficient rendering for large documents
- Memory-conscious processing
Core Components Overview
React PDF Renderer provides several key components for building documents. Understanding these helps you design layouts confidently.
1. Document
import { Document } from '@react-pdf/renderer';
<Document>
  {/* Other PDF components */}
</Document>- Acts as the root container
- Handles document-level properties
- Can contain multiple Page components
2. Page
Represents a single page.
import { Page } from '@react-pdf/renderer';
<Page size="A4" style={styles.page}>
  {/* Page content */}
</Page>- Supports presets (A4, Letter, etc.) and custom sizes
- Page-specific styling
- Controls page breaks and content flow
3. View
A container similar to HTML’s div.
import { View } from '@react-pdf/renderer';
<View style={styles.container}>
  {/* Container content */}
</View>
- Creates layout sections
- Flexbox support
- Nestable for complex layouts
4. Text
Renders text.
import { Text } from '@react-pdf/renderer';
<Text style={styles.text}>
  This is some PDF text content
</Text>- Text styling (size, weight, color)
- Automatic wrapping
- Custom fonts and weights
5. Image
Embeds images.
import { Image } from '@react-pdf/renderer';
<Image
  src="https://static-careers.moneyforward.vn//path/to/image.jpg"
  style={styles.image}
/>- Local or remote images
- Scaling and fit behavior
- Use base64 for environments without CORS
6. Link
Clickable links.
import { Link } from '@react-pdf/renderer';
<Link src="https://example.com">
  Click here to visit website
</Link>- External or internal URLs
- Customizable link styles
Setting up the environment
Install the library using npm or yarn:
# Using npm
npm install @react-pdf/renderer
# Using yarn
yarn add @react-pdf/renderer
Optional but recommended:
- Place fonts under src/fonts/ (e.g., src/fonts/NotoSansJP.ttf)
- Use React 18+ and a modern bundler (Vite, CRA, Next.js with dynamic import for client-side)
Quick start: build a simple PDF
Create src/components/ReportDocument.js:
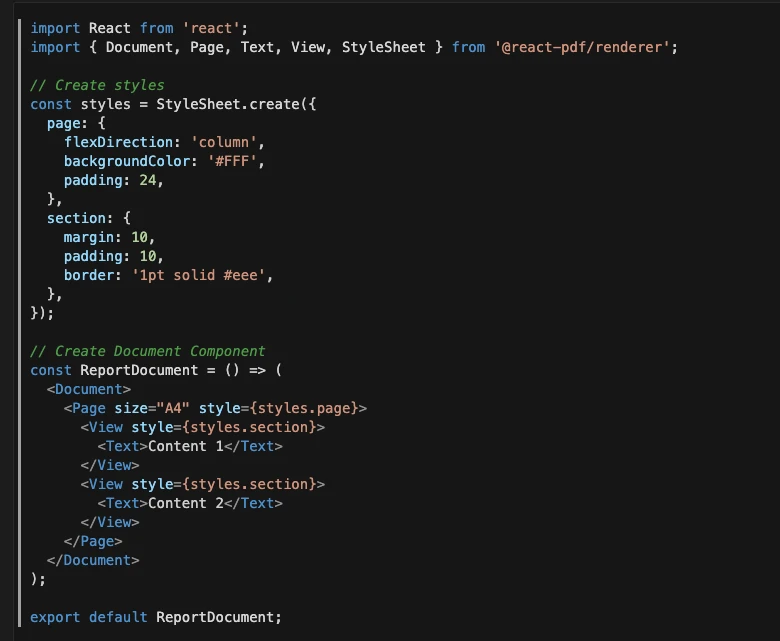
Integrate it into your app, e.g., src/App.js:
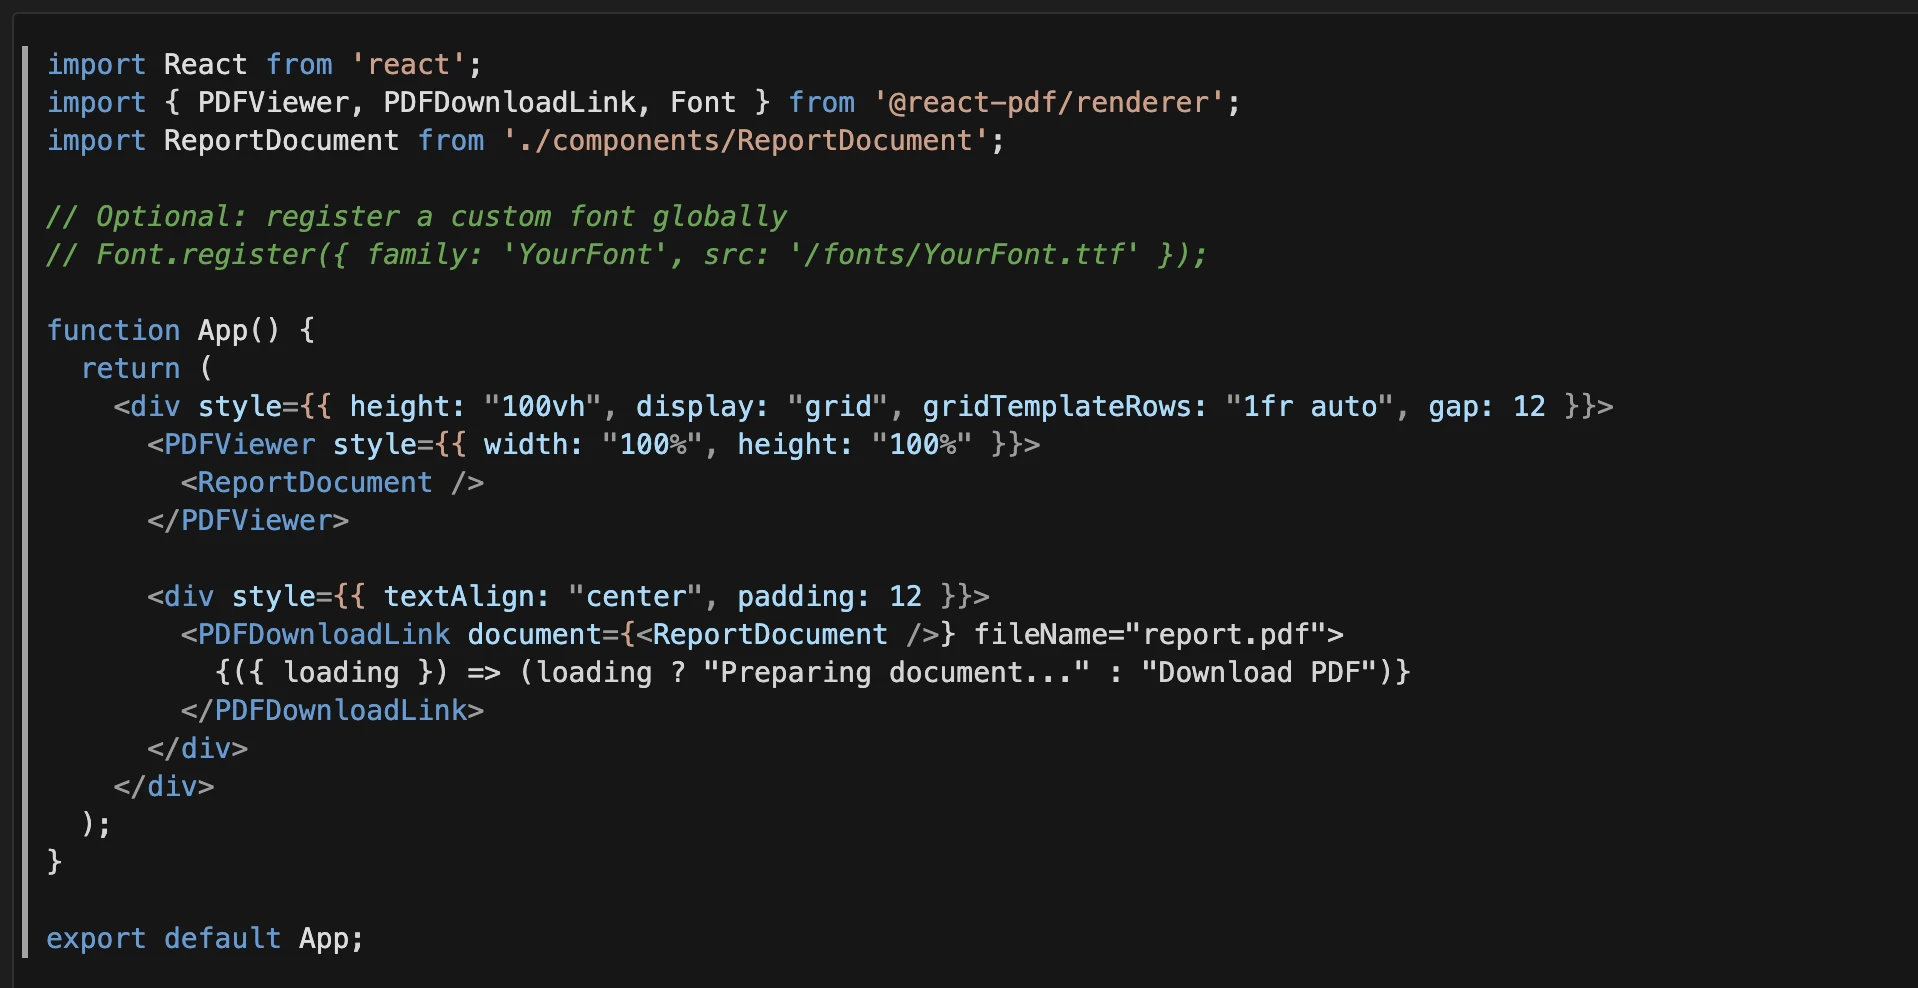
Start your development server:
npm start
# or
npm run dev
Open your browser and visit http://localhost:3000.
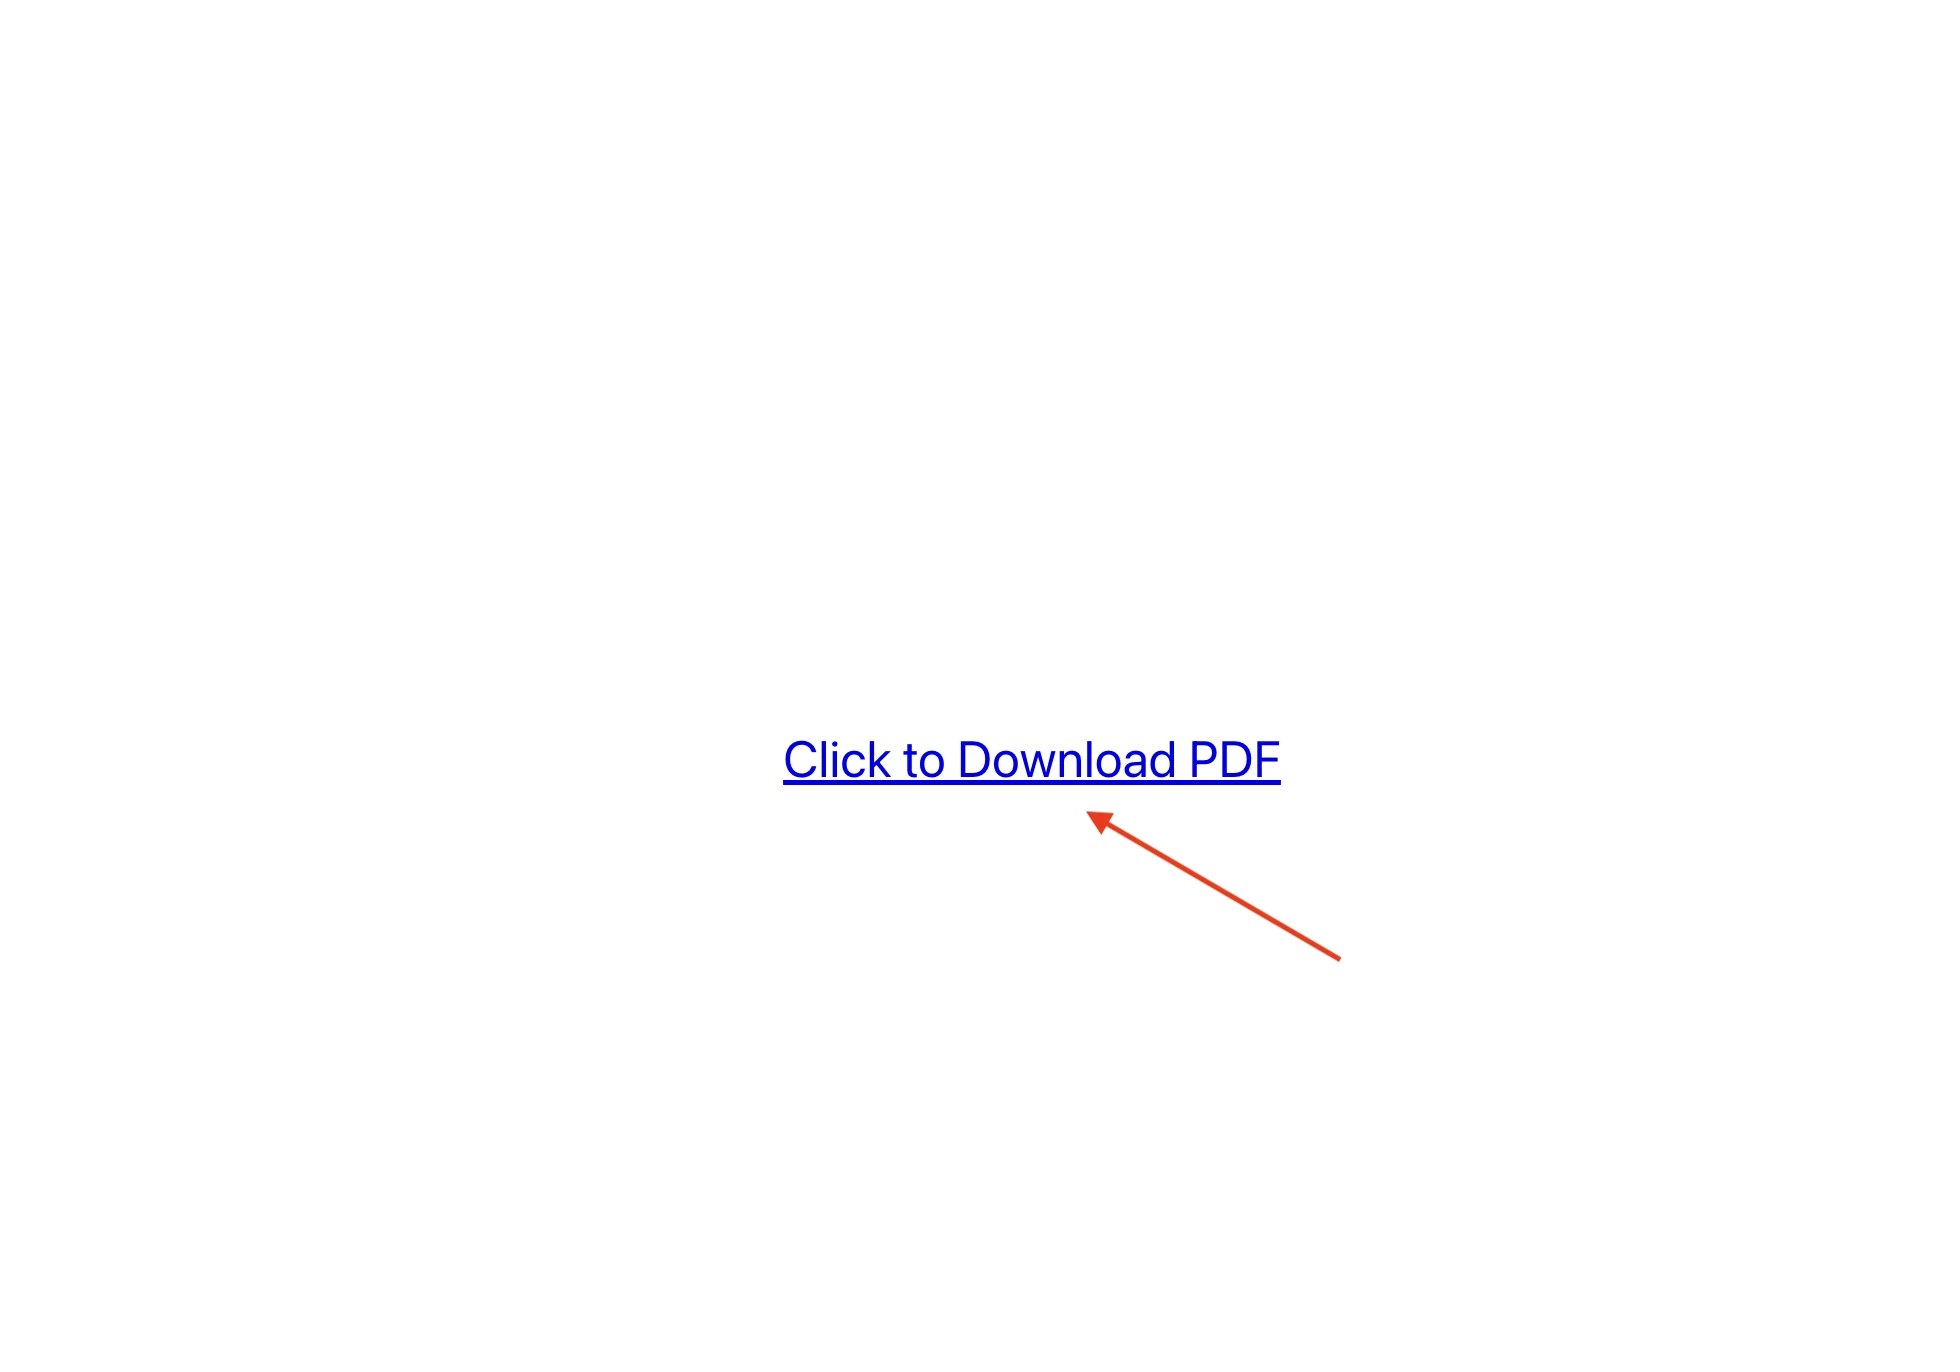
Download the PDF using the link, then open it to view the format shown below.
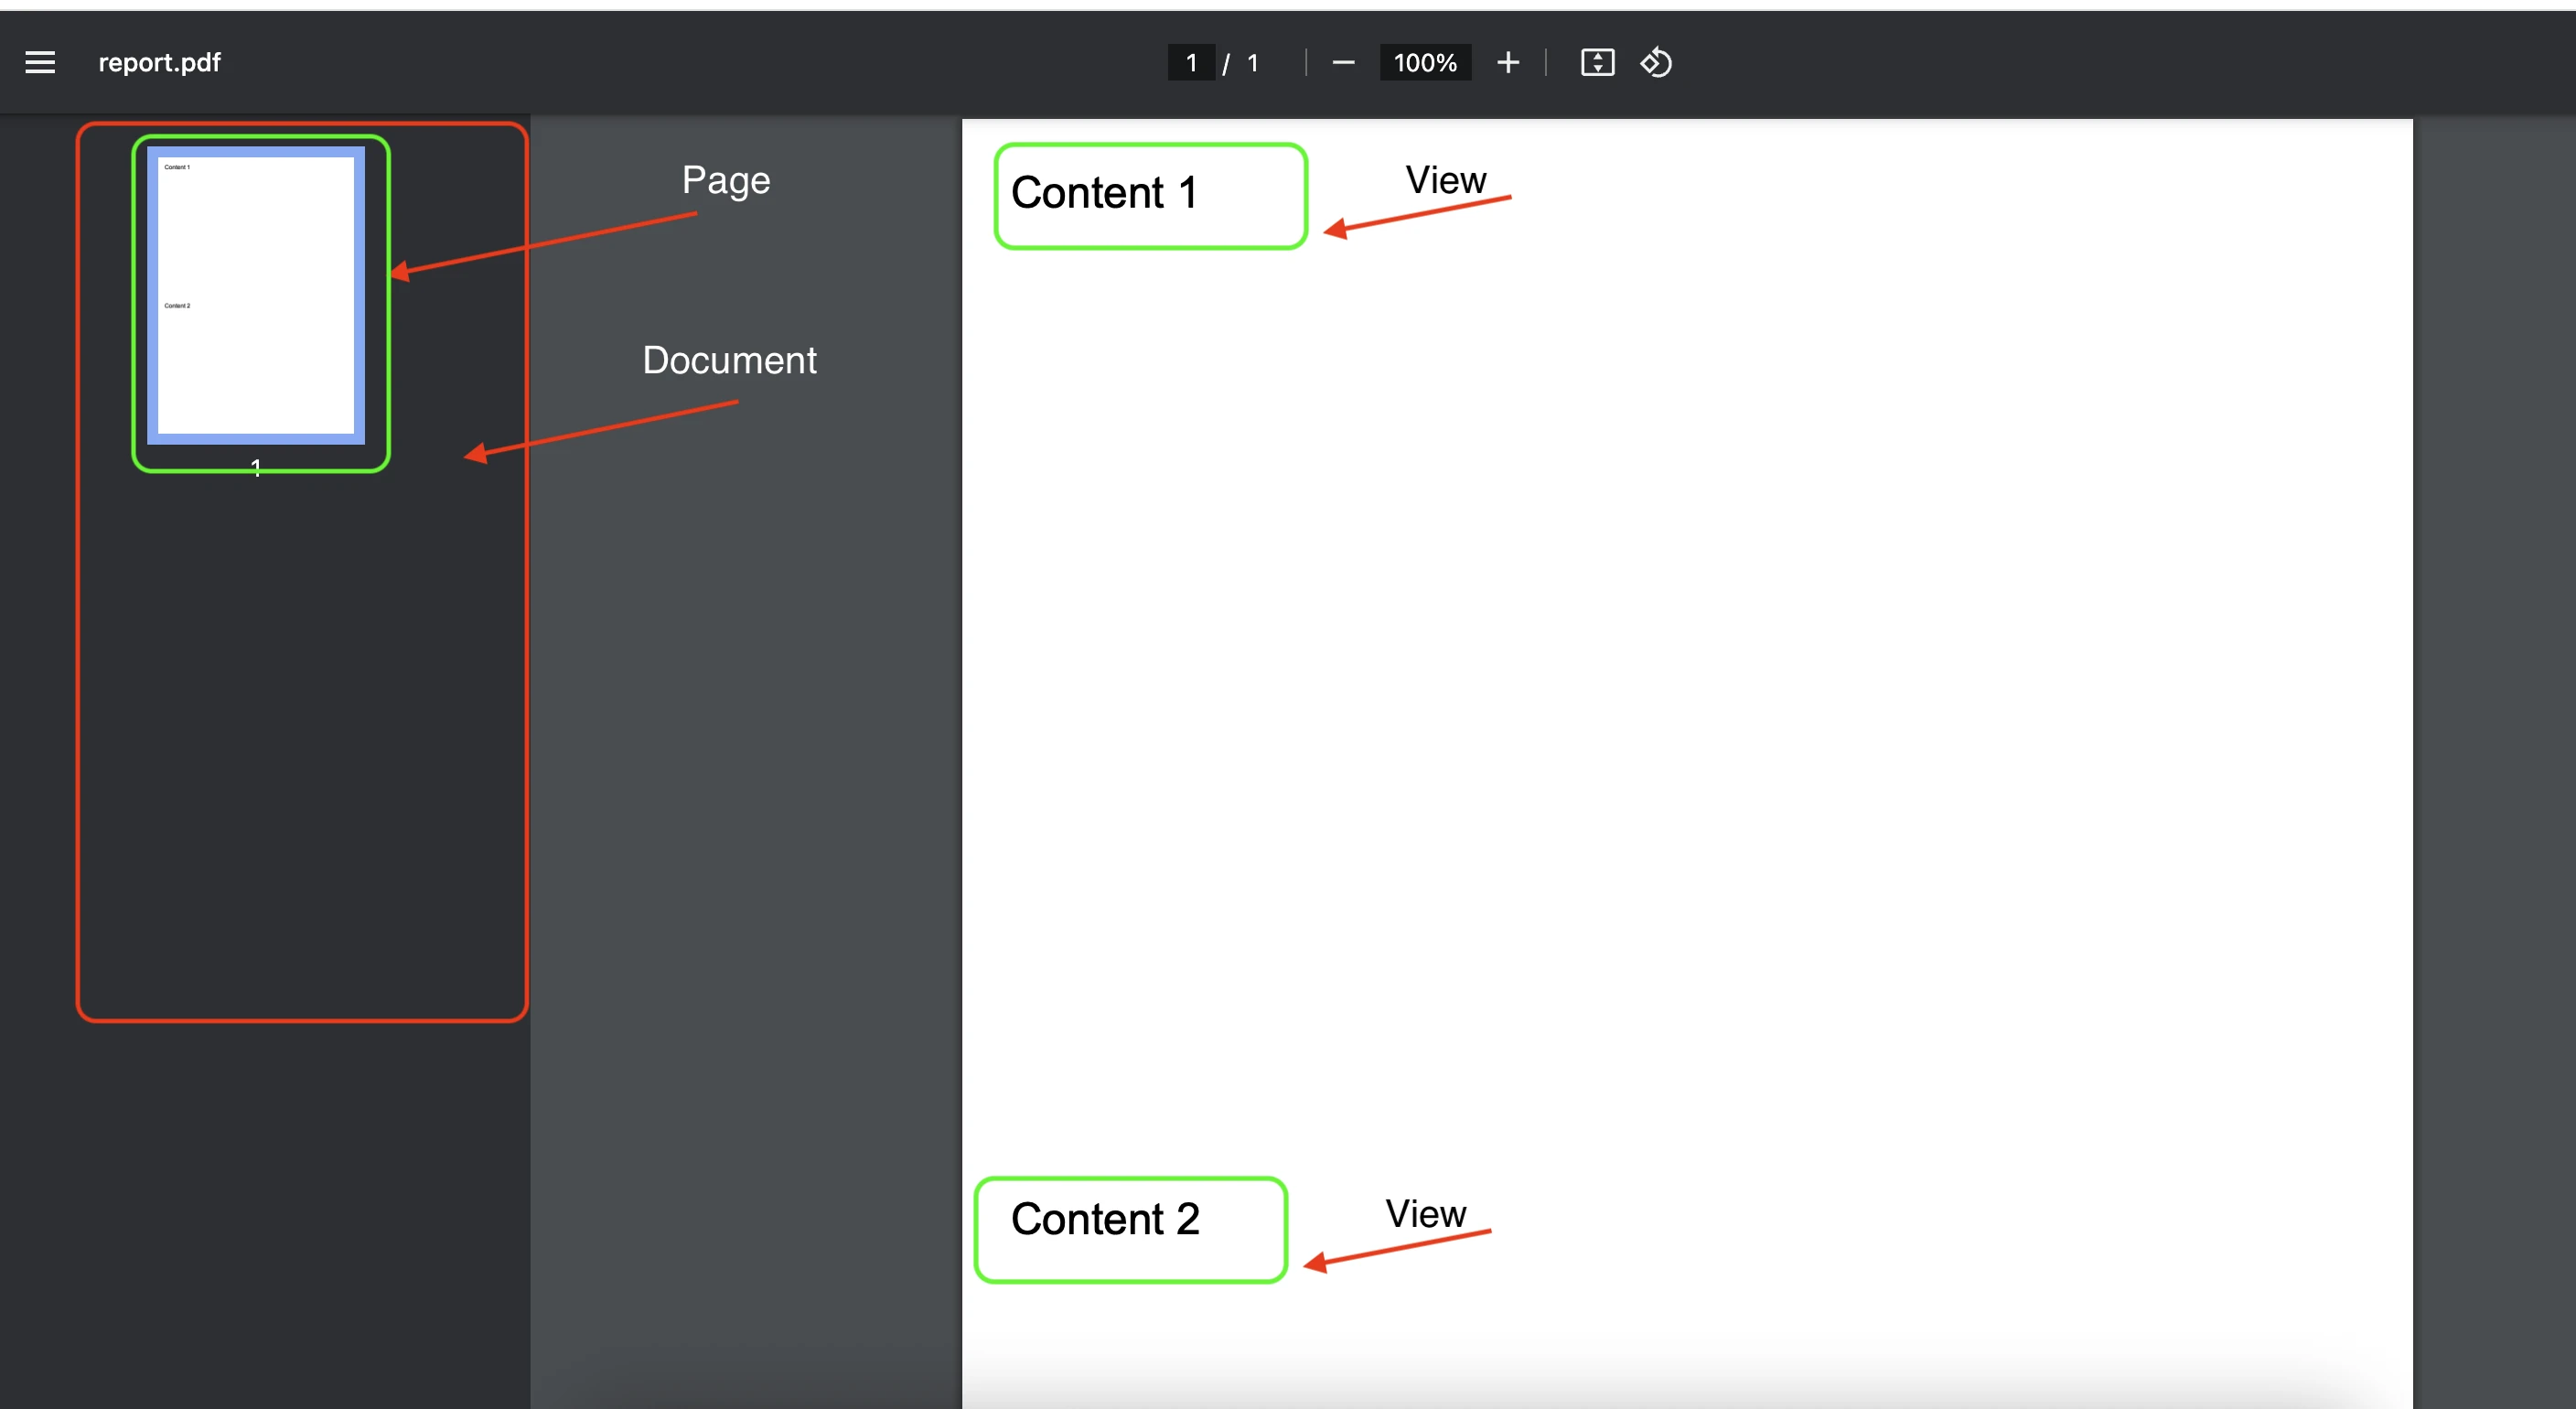
React PDF centers around three primary elements:
- Document
- Page
- View
Create a Japanese business form
Let’s build a practical example: a Japanese business form (確認書) using React PDF Renderer. This example shows how to:
- Use a Japanese font
- Build a structured layout with inputs
- Handle proper spacing and line height

1. Set up Japanese font support
Add your font (e.g., NotoSansJP.ttf) to src/fonts/, then register it:
import { Font } from '@react-pdf/renderer';
import NotoSansJP from './fonts/NotoSansJP.ttf';

Font.register({
  family: 'NotoSansJP',
  src: NotoSansJP,
});
2. Create the styles
import { StyleSheet } from '@react-pdf/renderer';

const styles = StyleSheet.create({
  page: {
    fontFamily: 'NotoSansJP',
    fontSize: 11,
    padding: 40,
    lineHeight: 1.6,
  },
  header: {
    textAlign: 'center',
    marginBottom: 40,
  },
  title: {
    fontSize: 16,
    marginBottom: 5,
  },
  subtitle: {
    fontSize: 12,
  },
  recordTitle: {
    textAlign: 'center',
    marginBottom: 20,
  },
  date: {
    textAlign: 'right',
    marginBottom: 40,
    flexDirection: 'row',
    justifyContent: 'flex-end',
    alignItems: 'center',
    gap: 4,
  },
  dateItem: {
    width: 20,
    marginHorizontal: 5,
    textAlign: 'center',
    borderBottom: '1pt solid #000',
    height: 14,
  },
  dateLabel: {
    marginLeft: 2,
  },
  intro: {
    marginBottom: 16,
  },
  section: {
    flexDirection: 'row',
    alignItems: 'flex-start',
    marginBottom: 12,
  },
  checkbox: {
    width: 15,
    height: 15,
    borderWidth: 1,
    borderColor: 'black',
    marginRight: 12,
    marginTop: 2,
  },
  note: {
    marginTop: 10,
    fontSize: 10,
    lineHeight: 1.5,
  },
  formSection: {
    marginTop: 20,
  },
  formItem: {
    flexDirection: 'row',
    alignItems: 'center',
    marginBottom: 15,
  },
  formLabel: {
    width: 150,
  },
  formInput: {
    flexGrow: 1,
    borderBottomWidth: 1,
    borderBottomColor: 'black',
    padding: 2,
    minHeight: 14,
  },
  endMark: {
    textAlign: 'right',
    marginTop: 40,
    fontSize: 10,
  },
});
3. Create the ReportDocument for the form
 import React from 'react';
import { Document, Page, Text, View } from '@react-pdf/renderer';
// Ensure the font registration and the styles object above are imported/applied

const ReportDocument = () => (
  <Document>
    <Page size="A4" style={styles.page}>
      <View style={styles.header}>
        <Text style={styles.title}>記載内容に関する確認書</Text>
        <Text style={styles.subtitle}>申請等に関する同意書</Text>
        <Text style={styles.subtitle}>(育児休業給付・出生後休業支援給付用)</Text>
      </View>

      <View style={styles.date}>
        <Text>令和</Text>
        <Text style={styles.dateItem}></Text>
        <Text style={styles.dateLabel}>年</Text>
        <Text style={styles.dateItem}></Text>
        <Text style={styles.dateLabel}>月</Text>
        <Text style={styles.dateItem}></Text>
        <Text style={styles.dateLabel}>日</Text>
      </View>

      <View style={styles.intro}>
        <Text>私は、下記の事業主が行う</Text>
      </View>

      <View>
        <Text style={styles.recordTitle}>記</Text>

        <View style={styles.section}>
          <View style={styles.checkbox}></View>
          <Text>育児休業給付の受給資格の確認の申請について同意します。</Text>
        </View>

        <View style={styles.section}>
          <View style={styles.checkbox}></View>
          <Text>
            雇用保険法施行規則第 101 条の 30・第 101 条の 33・第 101 条の 42 の規定による育児休業給付・出生後休業支援給付の支給申請について同意します(今回の申請に続く今後行う支給申請を含む。)
          </Text>
        </View>

        <Text>(該当する項目にチェック。複数項目にチェック可)</Text>

        <View style={styles.note}>
          <Text>※本同意書の保存期限は、雇用保険法施行規則 第 143 条の規定により本継続給付に係る完結の日から4年間とします。</Text>
        </View>
      </View>

      <View style={styles.formSection}>
        <View style={styles.formItem}>
          <Text style={styles.formLabel}>事業所名称</Text>
          <View style={styles.formInput}></View>
        </View>
        <View style={styles.formItem}>
          <Text style={styles.formLabel}>事業主氏名</Text>
          <View style={styles.formInput}></View>
        </View>
        <View style={styles.formItem}>
          <Text style={styles.formLabel}>被保険者番号</Text>
          <View style={styles.formInput}></View>
        </View>
        <View style={styles.formItem}>
          <Text style={styles.formLabel}>被保険者氏名</Text>
          <View style={styles.formInput}></View>
        </View>
      </View>

      <View style={styles.endMark}>
        <Text>以上</Text>
      </View>
    </Page>
  </Document>
);

export default ReportDocument;
4. Hook it up in App.js
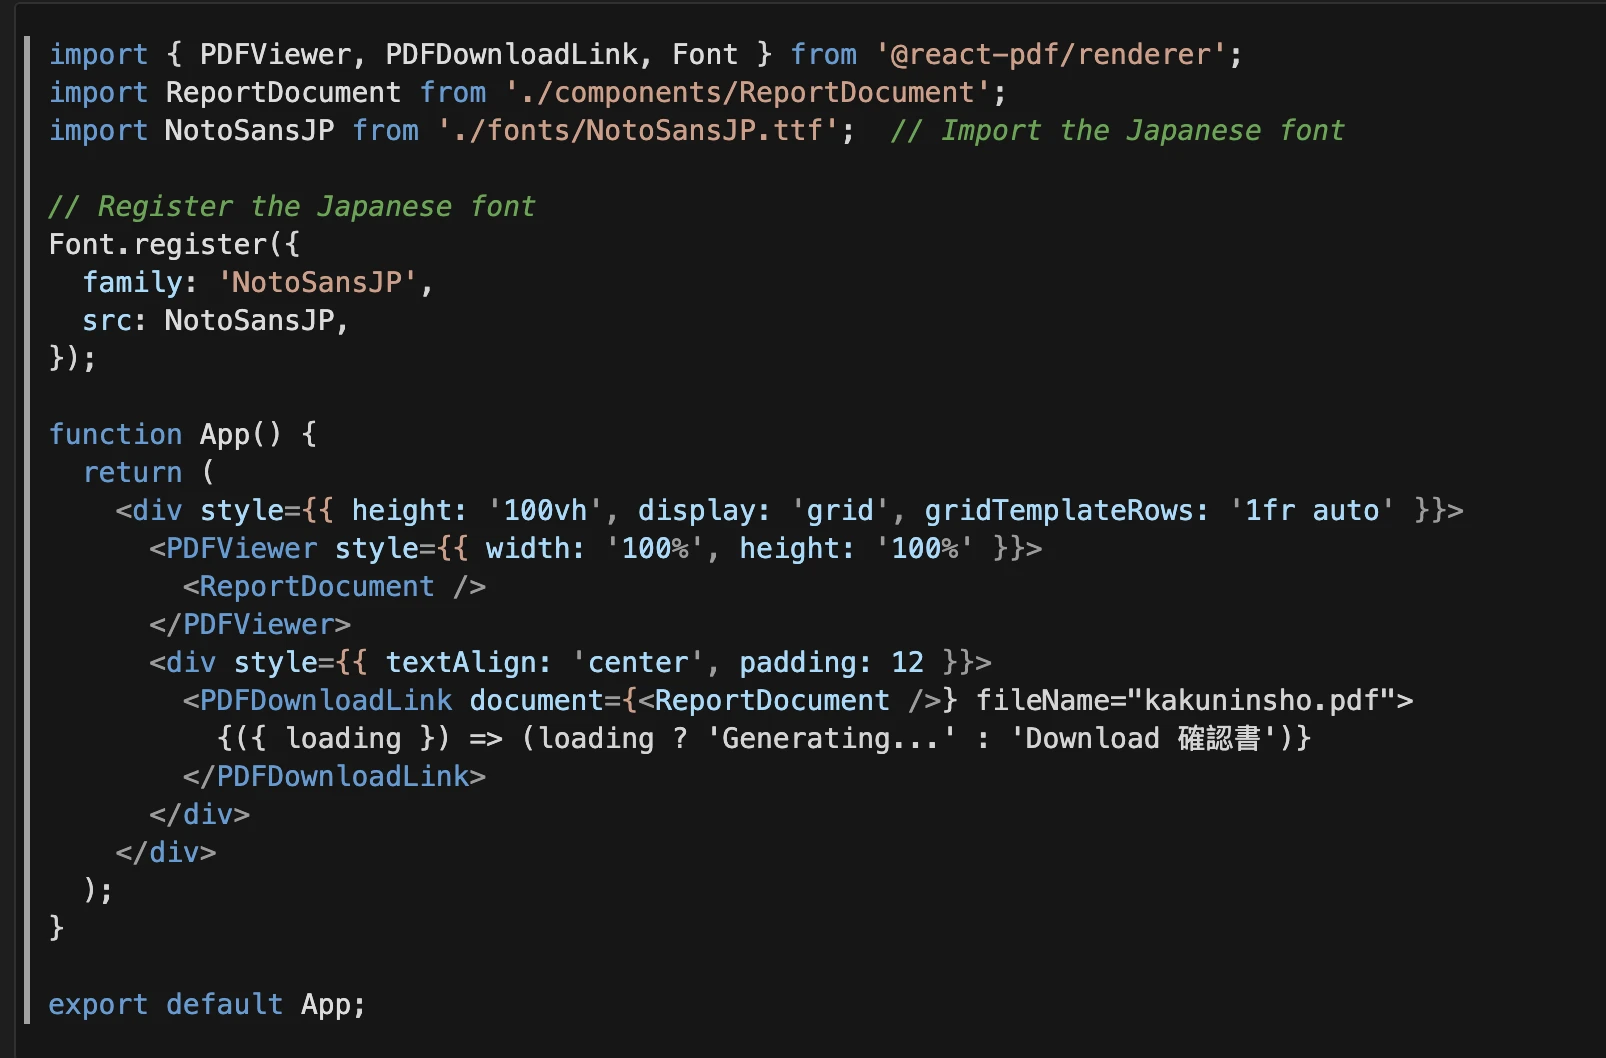
Refer to the full source code here
Common challenges and solutions
1. Page breaks
// Force a page break before this element
<View break>
  <Text>New Page Content</Text>
</View>

// Keep a header or footer fixed on each page
<View fixed>
  <Text>Header content</Text>
</View>
2. Dynamic content
// Prevent a block from being split across pages (use carefully)
<View wrap={false}>
  <Text>{longParagraph}</Text>
</View>

// Render long lists safely (they will paginate automatically)
{items.map((item, i) => (
  <View key={i} style={styles.row}>
    <Text>{item.name}</Text>
  </View>
))}
3. Custom fonts
 Font.register({
  family: 'CustomFont',
  fonts: [
    { src: 'regular.ttf' },
    { src: 'bold.ttf', fontWeight: 'bold' },
    { src: 'italic.ttf', fontStyle: 'italic' },
  ],
});
4. Page numbers
<Text
  style={ position: 'absolute', bottom: 24, right: 40, fontSize: 10 }
  render={({ pageNumber, totalPages }) => `${pageNumber} / ${totalPages}`}
/>
5. Headers/footers
<View fixed style={ position: 'absolute', top: 16, left: 40, right: 40 }>
  <Text>Company Name — Confidential</Text>
</View>
<View fixed style={ position: 'absolute', bottom: 16, left: 40, right: 40 }>
  <Text>© 2025 Company</Text>
</View>
6. Images and CORS
- In the browser, remote images must allow CORS.
- If CORS is a problem, use base64 data URLs or host images on the same domain.
<Image src={`data:image/png;base64,${base64}`}/>7. Document Generation Strategy: Choosing the Right Approach
Server-Side Generation (Backend Power)
- Utilize the backend for high-stakes, high-volume tasks that demand control and security. This method is the strongest choice when dealing with:
- Security-Sensitive Data: Ensuring confidential information never leaves the server boundary.
- Complex Layouts: Guaranteeing pixel-perfect consistency and design integrity across all outputs.
- Automated & Batch Reports: Handling scheduled, non-interactive report generation efficiently.
- Massive Datasets: Processing and aggregating very large data volumes that would overload a client browser.
Client-Side Generation (Frontend Agility)
- Prioritize the frontend for a fast, interactive user experience and reduced server dependency. This approach is ideal for:
- Real-Time Previews & Customization: Giving users instant feedback and control over the final output.
- Reduced Server Load: Offloading processing power to the user's device, freeing up server resources.
- Simple, Dynamic Documents: Generating light-weight documents where speed and responsiveness are key.
- Interactive Reports: Where the document is generated based on immediate user selections and filters.
The Hybrid Strategy (Balanced Efficiency)
- A flexible architecture that combines server-side power with client-side interactivity. Use this approach to:
- Securely Process Data: Run the heavy lifting (data access, calculations) on the backend.
- Offer Dynamic Rendering: Allow the final presentation and customization to happen on the frontend.
- Scale Based on Need: Find the optimal balance point between data complexity and user-specific rendering requirements.
8. Performance tips
- Avoid rendering very large arrays in one page; split into logical sections.
- Memoize expensive calculations before rendering.
- Prefer vector assets (SVG converted to paths) when possible.
Conclusion
React PDF Renderer offers a powerful, flexible way to generate PDFs directly from React applications. In this post, we:
- Built a simple PDF viewer and download flow
- Implemented a real-world Japanese form with custom fonts
- Covered essential patterns (pagination, headers/footers, page numbers)
- Shared practical tips for fonts, images, and performance
With these building blocks, you can confidently create production-quality PDFs for invoices, reports, and internal documents.
Resources


Tech.IT Forward #4: Tổng hợp Q&A
.png)
